Sunday, July 29, 2012

Review: Giorgio Armani Eyes to Kill Intense Eyeshadow #6♥

So Giorgio Armani beauty was having a 20% sale on their website some time around last month, and I did not want to miss the opportunity to get their products! I previously already owned their luminous silk foundation and I end up to like it so much :) It is a very good foundation and what I like about it most is that it blends in to skin so perfectly, weightless and foundation-less on the face :) Way to go, Giorgio!


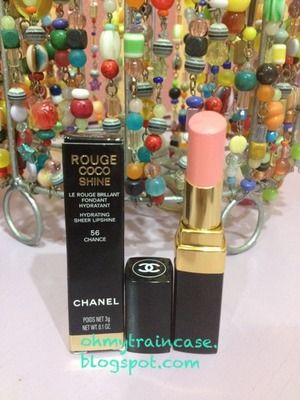
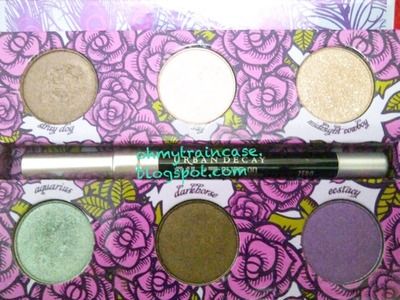
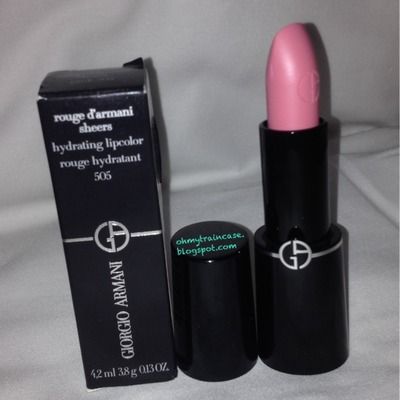
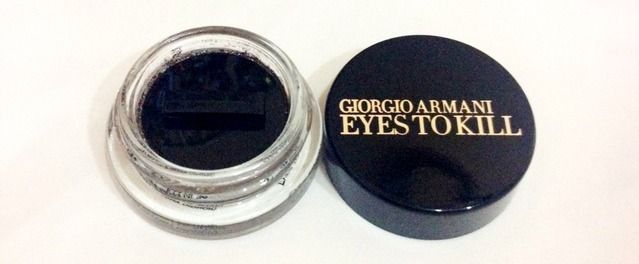
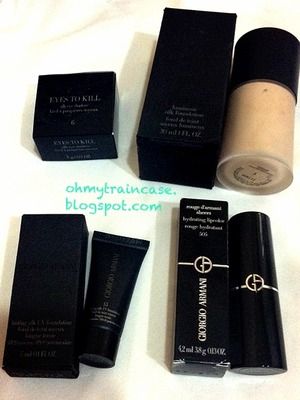
I end up getting two kind products on the sale, the first one is the Giorgio Armani Rouge D'Armani Sheers Hydrating Lipcolor #505 and Giorgio Armani Eyes to Kill Intense Eyeshadow #6 :D


This is what Giorgio Armani claims about the Eyes to Kill Intense Eyeshadow:


“Each shade is intensified with a second pigment for a multi-dimensional effect. In just one swoop, create a wet, shimmering smokey eye … Base color covers eyelid, and second pigment adds drama to the contour. Twenty four hour color wear, crease proof, flake proof, waterproof and sweat-proof, Eyes To Kill Intense Eyeshadows slide on, stay on, but wipe off in an instant.”  


I've heard some of a very good reviews about this product and I am really interested to try! And to be honest, after trying it for the first time, this product really impress me! The shadow just glides so easily, and the pigmentation quality is an excellent one! The texture of the shadow is a bit like cream eyeshadow but not a hundred percent creamy, so just in between creamy, but not too powdery either. Because of the texture, it makes the eyeshadow so rich, silky, smooth, and don't forget to mention it is so easy to blend! 

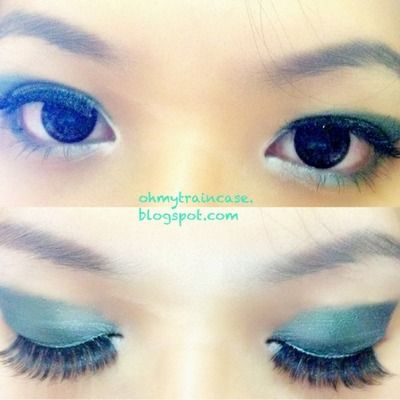
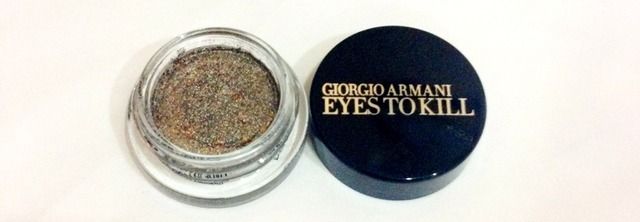
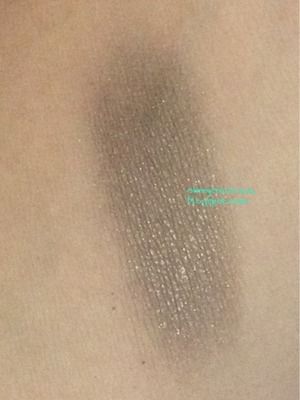
Here's the swatch of it on my skin, and it being applied on my eye lid :) It is actually a greyish brown with a hint of gold shimmer. If you apply it lightly, it is a very good daily eyeshadow, but if you apply it heavily and you can also wet the eyeshadow with water, it will produce you a more pigmented color pay off and it will look very good for a smokey brownish eye make up.
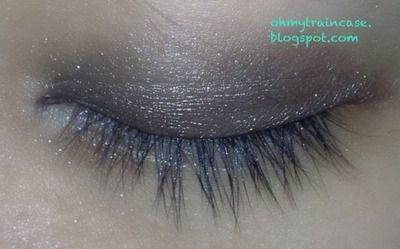
so sorry kalo keliatan polos, aku sengaja ga pake blend dgn
eyeshadow lain supaya bisa kelihatan the only color of the
Giorgio Armani Eyes to Kill #6 tanpa eyeshadow lain, eyeliner,
dan juga mascara. So it is my plain eye with the only product :)


Overall, this is an excellent product! Can't wait to try the other shades available of this product. The only down side of the product is..... It is expensive :'(
All of make up junkies out there should try the Giorgio Armani Beauty Product, because out of all the products from Giorgio Armani Beauty that I have tried, to be honest, it is never disappointing! The quality is very well made. And if it is on SALE again I can't wait to try another product from the brand! :)


I hope my review was helpful for you ;)

So enjoy reading OH MY TRAINCASE! 
xoxo

Friday, July 20, 2012

Review: Chanel Beauty♥

Let me start by saying, " Chanel di HongKong murah lohh, pressed powder aku dibeliin skitar 300rb-an, n lipsticknya ga sampe 300rb! Around 270! :)"


Earlier in June, I have the chance to go on a holiday, quite a short holiday, around 5 days, to HongKong. I have always been very excited to go there because I knew that HongKong has a great varieties of cosmetics and beauty products, especially when the SaSa (a beauty department store) there are distributed on every part of HongKong, just like Indomaret in Indonesia! Wow! :D


So I end up getting so many make up stuffs from HongKong, including international brands such as Chanel, M.A.C, Giorgio Armani Beauty, Dior, and also The Balm, I also came across some interesting asian brand cosmetics such as Majolica Majorca, Kiss Me Heroine, and also DollyWink. Seems a lot of shopping, but to be really honest, I didn't shop much, only my friends ask me to buy stuffs for them, and trust me, it is a LOT of stuffs! Hahaha.. Need to know that Kiss Me Heroine Make Smooth Liquid Eyeliner has always been my favorite eyeliner! I'll do a review on that later on :)


Getting branded make up at HongKong airport is much cheaper compared to the store at malls. So I really suggest you guys to e patient and wait for yourself to get any branded make up that you've been drooling at the airport ;)


I got my Chanel Natural Finish Pressed Powder at the airport and I remember it is waaaaay cheaper.

I got this in the shade of 50 peche, I am interested in buying this Limited Edition shade because I am just curious. I normally wear the compact in the shade of 20 clair, but when I tried 50 peche, it is so alike with the 20 clair, only that the 50 peche has slight soft shimmer in it, which will make the face looks slightly awake and illuminate. This powder is good for touch up, and has a very good oil control.


Then in July, My Dad and My Auntie were also traveling to HongKong and for the oleh-oleh they got me these:
Chanel Natural Finish Loose Powder and Chanel Le Blanc Brightening Loose Powder
Since I ran out of my Chanel loose powder and need to get a new one, I ask them to buy it for me. Chanel Natural Finish Loose Powder is just a normal loose powder and I normally used it alone as a powder after primer application, or I use it for a finishing touch after a foundation application. I got this in the shade of 30 naturel, and it suits my nc30 skin. It has a very good oil control, and I really do have an oily skin :p

On the other hand, Chanel Le Blanc Brightening Loose Powder has the same concept with the Guerlain Meteorites, it is supposed to give the skin a glowy looking finish. Only this Chanel one has the effect of a little bit whitening to the skin. Here's the swatch of the powder:


Left: Chanel Le Blanc Brightening Loose Powder swatch on finger. It is a white powder with a slight tiny shimmer.
Right: Swatch blended. When blended, it gives the effect brightening and awakening. I recommend applying this powder with a stipple brush though, so not so many shimmer will be deposit in the brush. :)

The last things that I got are lip products, it is the Chanel Rouge Coco Shine Lipstick in the shade 56 Chance and also Chanel Rouge Coco Lipstick in the shade 35 Chintz. I can't get the swatch on 35 Chintz because my mom is currently borrowing them :p I promised when I get the 35 Chintz back I'll post the swatch :)


Anyway, here's Chanel Rouge Coco Shine Lipstick 56 Chance:

Chanel Rouge Coco Shine 56 Chance Swatch on Skin

Here are the swatches of 56 Chance on skin and on my lips:
Chanel Rouge Coco Shine 56 Chance on Lips


I really like Chanel Rouge Coco Shine because of the texture and the finishing of it is sooooo good, just  like lip balms, with a great and sweet color! The shade 56 Chance is just a milky peachy baby pink, soft, just like a pastel pink color. I am lovin' it! :)

That's it, that's all I have for you! :D


I hope my review was helpful for you ;)

So enjoy reading OH MY TRAINCASE! 
xoxo

P.S: GiveAway soon.. Stay tuned! :* *hugs*

Review: Cargo Catalina, Shu Uemura M Pink 33E and The Balm DownBoy. Alike, but not alike! ♥

Alike but not alike! Serupa tapi tak sama! There it goes. A sentence that describe these blushes well. The 3 blushes that I'm going to be reviewing today are at the top of my favorite blush, not to mention that I am crazy about pink blushes, so crazy that all the blushes' color that I owned are similar to one another! Oh no, that's not good, isn't it? I figured. Hahaha..


So the blushes that I'm gonna be reviewing today are:
- Cargo Blush, shade: Catalina. 8.9 gram. $29. You can find this at www.beauty.com, I ordered mine from that website. 
- Shu Uemura Glow on Blush, shade: M Pink 33E. 4 gram. (Sorry I forgot the price, I bough it in the counter :p)
- The Balm Blush, shade: DownBoy. 8.5 gram. $21. You can find this at www.sephora.com or www.beauty.com, I ordered mine from Sephora. 


Here's how they look like:
Cargo Catalina-Shu M Pink 33E-The Balm DownBoy
Sooooo pretty isn't it? :)

Swatches:
The Balm DownBoy-Shu M Pink 33E-Cargo Catalina
Cargo Catalina-The Balm DownBoy

Compared all of the three blush, here's the winner for some aspects:
Based on the TEXTURE OF THE BLUSH the winner is: Cargo Catalina
Based on the PIGMENTATION OF THE BLUSH the winner is: The Balm DownBoy
But based on the color, the favorite one in my heart is the Shu Uemura M Pink 33E, it's the perfect pink  for daily use :)

wearing Shu Uemura M Pink 33E :)
wearing The Balm DownBoy

I'm sorry for some reason I can't find my photo wearing Cargo Catalina.. ;) Oh yaa and for the reference my skin tone is yellow undertone and it is NC 30 wearing M.A.C foundation whatsoever :)

I hope my review was helpful for you to decide what blush on are you going to buy ;)

So enjoy reading OH MY TRAINCASE! 
xoxo


Monday, July 16, 2012

EOTD: Peacocky Green Eyes♥

YEAY! Eotd time! EOTD is eyes of the day :D
For this time the theme of my EOTD is Peacocky Green Eyes. I don't know why I pick this name, but I surely think that the name suits the make up look :p
So here's the sneak peak of the look:

I created this look mainly using this palette below:


It is a very pretty palette with a selection of quite colorful but neutral palette. And when purchase you will also get a mini eden primer potion (my favorite for oily lids) and also a travel size "zero" 24/7 glide-on eyeliner. This palette is on sale now on www.urbandecay.com for $19! What a great deal :)

So to create the look above I mainly used the Urban Decay Feminine palette, but on the outer corner I used a darker green eyeshadow taken from my Too Faced Smokey Eye Palette called Wicked Green.


So here's the step by step:
1. Apply an eyeshadow primer. (I'm using MAC Paint Pot in Painterly)
2. Apply the lightest color from the Urban Decay Feminine Palette (the shade name is "swf") on the inner corner of the eyes.
3. Apply the green color from the Urban Decay Feminine Palette (the shade name is "aquarius") on the lid of the eyes.
4. Define the outer corner of the eyes using the "Wicked Green" from Too Faced Smokey Eye Palette. 
5. Don't forget to blend any harsh line of the eyeshadow!
6. Line the eyes using the Bobbi Brown Gel Eyeliner.
7. Apply False Lashes.
8. Reapply an eyeliner to soften the eyelash glue. 
9. Using an angled liner brush, take the "aquarius" shade and line it on the lower lash line.
10. Using another angled liner brush, take the "swf" shade and line it on the inner corner of the lower lash line. 
11. And you're pretty much done! ^^

Another final look:

I am sorry that the camera didn't quite catch the gradation of the eyeshadow.. :'( 

So I hope you guys enjoy the tutorial and may it be useful for all of you :)

So enjoy reading OH MY TRAINCASE! 
xoxo


Traincase Overall ~

HELLO everyone :)


Since the name of my blog is "oh my traincase", I figured that it will not be fair for you guys if I started writing in this blog without giving any sneak peak of my traincase.. :p 


My traincase is a messy one, so many stuffs in it that sometimes when I am in a hurry, I will just throw stuffs there. It is frustrating to get my traincase to be neat all the time, sometimes it is even so full it can't be closed properly! :D


Currently I owned 3 kinds of traincase. The first one is this one that I'm about to post. The second one is the smaller one, it's purple (my favorite color) so cute! But it doesn't fit anymore so the purple one I only use it sometimes for traveling. The last one is very small, a lil' bit bigger than a jewelry box, it's pink, and the inner part is covered with butterfly pattern. It is so cuteee ^^


So no further ado, here's the picture ^^


So can you spot what's in them? Share me the picture of your traincase too! :) :)

So enjoy reading OH MY TRAINCASE! 
xoxo

Thursday, July 12, 2012

So here it goes...♥

I myself have been wanting to have my own blog since like forever, but because of stuffs here and there, the intention has been delayed on and on and on :D I do own a blog previously but I think that blog has been swallowed by the world of massive internet (du-uh) a.k.a I lost the password and I even forgot the name of the blog itself. So here it is . . . :)


Since the fondness of me towards my make-up traincase (and everything in it) keeps getting wilder and wilder, I was hoping this blog can be a blog where I could share what I like to people that share the same interests with me, and to give some reviews of some particular products, as well as sharing cutie lovely appealing make up products and also other stuffs that I am currently loving! 


Before I went further though, there is this one thing I wanted to say.  I am not a professional beauty blogger, nor a professional make up artists. So, accept my early apologies and I hope that I will improve as time goes by. :)


So enjoy reading OH MY TRAINCASE! 
xoxo


Template by Suck My Lolly - Background Image by TotallySevere.com